- How does the Juniper NFX250 works?
- Juniper NFX250 basic setup
- ASIC used in NFX250
- Is it possible to run BGP router on JCP ?
- NFX250 Performance tests
Recently I got Juniper NFX250 for tests, will disassemble it and figure out what we can run on this unit.
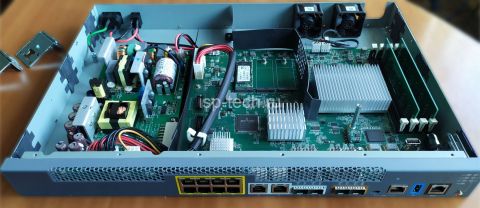
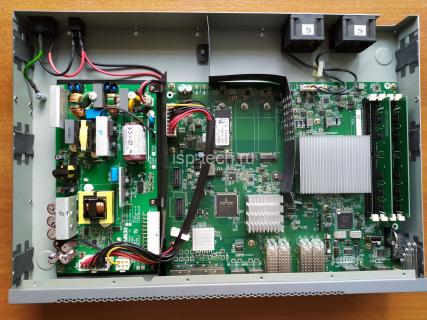
Taking off the hood to see what’s inside:
I will not take off the radiators, will try to learn from console which chip is hiding there.
So, we can see a mini server with an integrated packet processor from Broadcom.
On this model – Juniper NFX250 ATT LS1 :
CPU – 4 core Intel(R) Pentium(R) CPU D1517 @ 1.60GHz
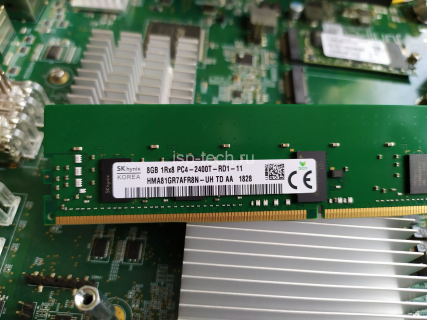
RAM – 16Gb DDR4
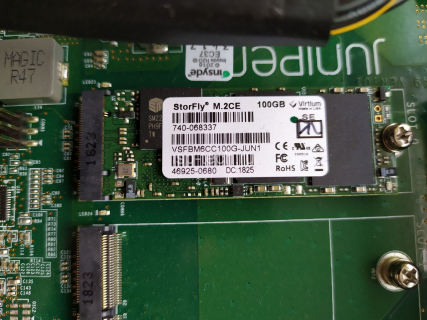
SSD – 100Gb
Apparently, adding memory or replacing disk will not be difficult. The most sore point is the CPU. It is hardwired to the board and cannot be replaced.
Here you can read the datasheet for the NFX250.
How does the Juniper NFX250 works?
There is Ubuntu 14.0.4 based hypervior under the hood.
Virtual Machines are working under KVM virtualization.
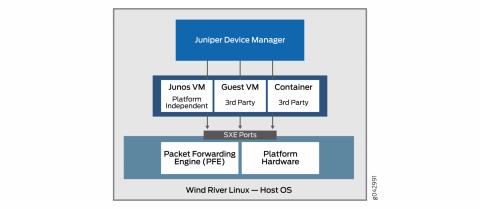
NFX250 is based on the following key components:
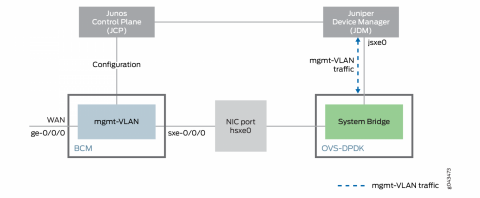
JDM (Juniper Device Manager) – Linux container for resource and virtual machines management, basically this is Juniper’s JunOS like virsh adaptation.
VM is called “jdm”.
JCP (Juniper Control Plane ) – Junos VM used for Data Plane configuration – ports, vlans etc.
VM is called “vjunos0”.
VNF ( Virtualized Network Function) – Virtual Machine or service. You can run anything as long as there are enough resources.
For example – vMX, vSRX, freeware FRR, Vyos etc.
Juniper NFX250 basic setup
Before starting the tests, I will install clean JUNOS 18.4R3.3
Let’s start with the first launch.
The first step is management sеtup. I will use the front panel MGMT port. This is the Out-of-Band management port and it is connected to the dedicated management bridge. The JDM jmgmt0 port is connected to the same bridge.
The first thing we will see in the console is JDM. Checking the list of running virtual machines:
root@jdm:~# cli
{master:0}
root@jdm> show virtual-network-functions
ID       Name                                              State      Liveliness
--------------------------------------------------------------------------------
2        vjunos0                                           Running    alive
11525    jdm                                               Running    alive

{master:0}
root@jdm>
Let’s set up management on JDM by enabling DHCP and setting up a password for root. By default, jmgmt0 is configured with the address 12.213.64.65/26:
root@jdm# show interface jmgmt0
vlan-id 0 {
    family {
        inet {
            address 12.213.64.65/26;
        }
    }
}

root@jdm# delete interface jmgmt0

{master:0}[edit]
root@jdm# set interface jmgmt0 vlan-id 0 family inet dhcp

{master:0}[edit]
root@jdm# set system root-authentication plain-text-password
New password:xxxxx
Retype new password:xxxxx

{master:0}[edit]
root@jdm#  set system services ssh root-login allow

{master:0}[edit]
root@jdm# commit
commit complete

{master:0}[edit]
root@jdm# quit
Exiting configuration mode

{master:0}
root@jdm>  show interface jmgmt0
JDM interface statistics
------------------------
Interface jmgmt0:
--------------------------------------------------------------

Link encap:Ethernet  HWaddr b0:33:a6:33:f3:cb


inet addr:10.0.17.193  Bcast:10.0.17.255  Mask:255.255.255.0
Ok, the management interface of JDP has got dhcp address and now we can log in via SSH. Let’s move on to setting up JCP management. By default, em0 is configured with the address 12.213.64.66/26:
root@jdm> ssh jdm-sysuser@vjunos0
Last login: Tue Jan 12 10:37:41 2021 from 192.0.2.254
--- JUNOS 18.4R3.3 Kernel 64-bit FLEX JNPR-11.0-20191211.fa5e90e_buil
{master:0}
jdm-sysuser> configure
Entering configuration mode

{master:0}[edit]
jdm-sysuser# set system root-authentication plain-text-password
New password:xxxxx
Retype new password:xxxxx

{master:0}[edit]
jdm-sysuser# set system services ssh root-login allow

{master:0}[edit]
jdm-sysuser# delete interfaces em0
jdm-sysuser# set interfaces em0 unit 0 family inet dhcp

{master:0}[edit]
jdm-sysuser# commit
configuration check succeeds
commit complete

{master:0}
jdm-sysuser> show dhcp client binding
IP address Hardware address   Expires State   Interface
10.0.17.174 b0:33:a6:33:f3:b8  86391  BOUND   em0.0
The JCP management also received an address via DHCP.
ASIC used in NFX250
Basic management setup id done, now we can login to JCP over SSH and see which chip is hiding under the radiator.
{master:0}
root> start shell
root@:RE:0% vty fpc0


Switching platform (1599 Mhz Pentium processor, 255MB memory, 0KB flash)

FPC0( vty)# set dcbcm diag
Boot flags: Probe NOT performed
Boot flags: Cold boot
Boot flags: initialization scripts NOT loaded
BCM.0>
BCM.0> show unit

Unit 0 chip BCM56063_A0 (current)
BCM.0>
BCM.0> show params
#######OMMITED############
driver BCM53400_A0 (greyhound)
unit 0:
        pci                     device b063 rev 01
        cmc used by pci         CMC0
        driver                  type 132 (BCM53400_A0) group 90 (BCM53400)
        chip                    xgs xgs3_switch xgs_switch
#######OMMITED############

####DO NOT USE "Exit command here", hit ctrl+c instead#####
BCM.0> exit on signal 2
root@:RE:0%
Based on the PFE console output, a Broadcom BCM56063 chip is hidden there. It was not possible to find an open datasheet for this chip.
Is it possible to run BGP router on JCP ?
Since JCP is powered by Junos, I was wondering if it possible to use it as a BGP router with Full View peers.
I have tried to fill in BGP Full table. Platform FIB was exhausted and following error thrown:
Jan 13 14:21:05 fpc0 brcm_rt_ip_uc_lpm_install:1372(LPM route add failed) Reason : Table full unit 0
Jan 13 14:21:05 fpc0 brcm_rt_ip_uc_entry_install:1230brcm_rt_ip_uc_entry_install Error: lpm ip route install failed vrf 0 ip 1.20.128/18 nh-swidx 1734 nh-hwidx 100007
JCP is limited to 1000 lpm routes.
Changing the profile to “l3-profile” does not affect the situation in any way:
root> show chassis forwarding-options
re0:
--------------------------------------------------------------------------
UFT Configuration:
l2-profile-three.(default)
num-65-127-prefix = 1K

{master:0}
root> show chassis forwarding-options
re0:
--------------------------------------------------------------------------
UFT Configuration:
l3-profile.
num-65-127-prefix = 1K

{master:0}
root> show pfe route summary hw

Slot 0

Unit: 0
Profile active: l3-profile
Type            Max       Used      Free      % free
----------------------------------------------------
IPv4 Host       4096      7         4085      99.73
IPv4 LPM        1024      3         1019      99.51
IPv4 Mcast      2048      0         2043      99.76

IPv6 Host       2048      2         2043      99.76
IPv6 LPM(  64)  512       1         510       99.61
IPv6 LPM( >64)  0         0         0         0.00
IPv6 Mcast      1024      0         1022      99.80
Ok, JCP cannot be used as regular MX router )
We can dont install routes to FIB and use this workaround in following cases:
– Use JCP as a route-server
– Forward Full View table(in case we have just one upstream)
Let’s try:
[edit interfaces xe-0/0/13 unit 0]
+     family inet {
+         address 172.16.23.2/30;
+     }
[edit protocols bgp]
+    group test {
+        type external;
+        export reject;
+        local-as 65234;
+        neighbor 172.16.23.1 {
+            family inet {
+                unicast {
+                    no-install;
+                }
+            }
+        peer-as 65000;
+        }
+    }
With this configuration, the session is established, routes are installed to RIB only. Filling the complete table (830k prefixes) takes 4 minutes.
root> show bgp summary
Threading mode: BGP I/O
Groups: 1 Peers: 1 Down peers: 0
Table          Tot Paths  Act Paths Suppressed    History Damp State    Pending
inet.0
                  830103     830102          0          0          0          0
Peer                     AS      InPkt     OutPkt    OutQ   Flaps Last Up/Dwn State|#Active/Received/Accepted/Damped...
172.16.23.1            65000     139620         15       0       1        5:45 Establ
  inet.0: 830102/830103/830103/0
Only 7% of free memory left:
re0:
--------------------------------------------------------------------------
System memory usage distribution:
       Total memory:  476164 Kbytes (100%)
    Reserved memory:   13388 Kbytes (  2%)
       Wired memory:  132664 Kbytes ( 27%)
      Active memory:  267656 Kbytes ( 56%)
    Inactive memory:   27840 Kbytes (  5%)
       Cache memory:       0 Kbytes (  0%)
        Free memory:   34612 Kbytes (  7%)
Memory settings of the JCP virtual machine can be edited from the hypervisor:
root@jdm:~# ssh hypervisor
Last login: Wed Jan 13 09:27:25 2021 from 192.0.2.254

root@local-node:/# virsh list
 Id    Name                           State
----------------------------------------------------
 2     vjunos0                        running

root@local-node:/# virsh edit vjunos0
Moving to next step – practice tests.
NFX250 Performance tests
The NFX250-S1 has the following specifications:
Managed Secure Router*** 2 Gbps
Managed Security*** 2 Gbps
IPsec*** 500 Mbps
*** Maximum throughput mode
We have NFX250 ATT LS1, it has 2 fewer cores.
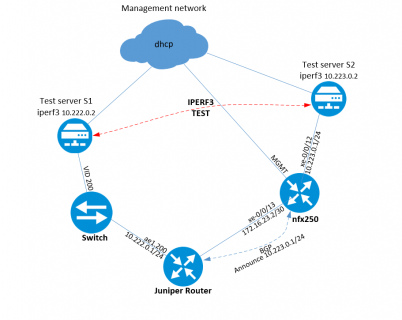
Let’s try to test the chip by passing traffic through the JCP.
Performing reference test by connecting the servers directly:
# iperf3 -c 10.10.0.2 -p 5201
Connecting to host 10.10.0.3, port 5201
[  4] local 10.10.0.2 port 42376 connected to 10.10.0.3 port 5201
[ ID] Interval           Transfer     Bandwidth       Retr  Cwnd
[  4]   0.00-1.00   sec  1.10 GBytes  9.42 Gbits/sec    0    482 KBytes
#######OMMITED############
- - - - - - - - - - - - - - - - - - - - - - - - -
[ ID] Interval           Transfer     Bandwidth       Retr
[  4]   0.00-10.00  sec  11.0 GBytes  9.41 Gbits/sec    0             sender
[  4]   0.00-10.00  sec  11.0 GBytes  9.41 Gbits/sec                  receiver
Lab scheme:
Now I run the test through JCP:
[s1]# iperf3 -c 10.223.0.2 -p 5201
Connecting to host 10.223.0.2, port 5201
[  4] local 10.222.0.2 port 58338 connected to 10.223.0.2 port 5201
[ ID] Interval           Transfer     Bandwidth       Retr  Cwnd
[  4]   0.00-1.00   sec  1.10 GBytes  9.41 Gbits/sec    0    464 KBytes
#######OMMITED############
- - - - - - - - - - - - - - - - - - - - - - - - -
[ ID] Interval           Transfer     Bandwidth       Retr
[  4]   0.00-10.00  sec  11.0 GBytes  9.41 Gbits/sec    0             sender
[  4]   0.00-10.00  sec  11.0 GBytes  9.41 Gbits/sec                  receiver

[s1]# iperf3 -c 10.223.0.2 -p 5201 -R
Connecting to host 10.223.0.2, port 5201
Reverse mode, remote host 10.223.0.2  is sending
[  4] local 10.222.0.2 port 58338 connected to 10.223.0.2 port 5201
[ ID] Interval           Transfer     Bandwidth
[  4]   0.00-1.00   sec  1.10 GBytes  9.41 Gbits/sec
#######OMMITED############
- - - - - - - - - - - - - - - - - - - - - - - - -
[ ID] Interval           Transfer     Bandwidth       Retr
[  4]   0.00-10.00  sec  11.0 GBytes  9.42 Gbits/sec    0             sender
[  4]   0.00-10.00  sec  11.0 GBytes  9.41 Gbits/sec                  receiver
The throughput is 9.41Gbps Full diplex. Not bad, but this is just test of integrated switch (PFE).
In the next part, we will deploy virtual machines with VyOS as VNF and repeat the throughput tests.

